![Synthnostate: Sanguinity [WIP DEMO]](https://img.itch.zone/aW1nLzE0OTg1MTQzLnBuZw==/original/i81okk.png)
Synthnostate: Sanguinity [WIP DEMO]
HOWTO: Sculpt-Retopo-Bake PBR Textures In Blender3
I picked up on this technique from a guy on Minds who goes by the handle Squishy Banana; you can find his posts and devstreams on https://www.minds.com/mmccarthy4/ and https://rumble.com/c/c-2013202 . He’s been building an impressive ‘medieval viking sim’ somewhat inspired by KCD, first demo due out in late summer. He’s using UE4, Maya, and various third-party tools like ZBrush, which he learned in school. I’ve been learning how to do the same thing in Blender, which has become an all-in-one powerhouse in the last few years. I’m also using Godot but this will work just as well in Unreal, Unity, or even my homebrew engine if I add PBR support.
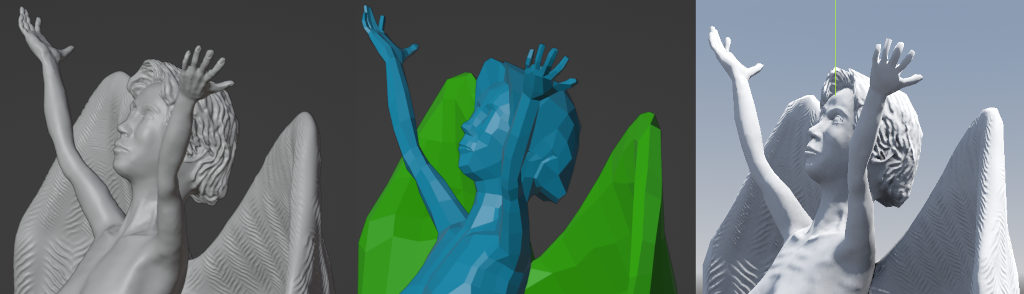
In a nutshell we’re going to create an ultra-high-res model (for example a human character) with fine detail such as skin creases, wrinkles, and even pores (you kinda need ZBrush for that level of detail, if you really want it; it can be fugly) by sculpting it as if from clay, then we bake textures onto a low-poly model. To create this low-poly model, we “retopologize” or trace over the high-poly model in 3D. There are automated retopo tools (such as the Decimate modifier) which are great for simpler models, but they can’t produce extra detail just where you need it around faces, curvy parts, and joints (important for animation) and they produce glitches you then have to clean up manually.
I’ll update this page as I learn more.
Sculpting
Setup
- Sculpting workspace, Object mode
- Add > Mesh > Ico Sphere (or whatever you want)
- or import an existing model with the general shape you want (I used one of my low-poly human models for my angel statue)
- name it something like “statue-hipoly” or “statue-hp”
- Viewport Overlays > enable Statistics (poly count etc)
- Sculpt mode
Increase mesh resolution
- Voxel Remesh
- Remesh > Adjust voxel size and click the Remesh button
- ctrl-R is a shortcut
- shift-R to adjust voxel size graphically
- also useful to join multiple meshes into one before sculpting
- you can remesh as you go along as long as you aren’t creating finer detail with Dyntopo
- Dyntopo
- subdivides the mesh as you draw; intuitive and particularly useful for models with fine detail in certain areas which would require millions of triangles if you remeshed the whole thing to the necessary resolution.
- Relative Detail (default) depends on your zoom level and brush size; very intuitive
- Constant Detail can be better if you’re zooming in and out a lot
- Subdivision Surface modifier is another way. You have to apply it.
- Multiresolution modifier is like subsurf but doesn’t alter your original model, and there’s a streamlined texture baking workflow for it. I haven’t tried it. I think it’s mainly useful for adding fine detail to an existing lowpoly shape.
- Whichever method(s) you use, keep an eye on your triangle count. 1 million seems fine for a decent desktop PC, 5-10 million is the practical limit where you’ll notice some lag, and you can handle 20 million or so with like a 5ghz 32-core CPU (which is what AAA-level artists use for this kind of work, but you don’t need one)
Brushes
- Draw (X)
- raises up the surface (in the direction of each vertex’s surface normal)
- hold Ctrl to invert (you can also use the +/- icons)
- hold Shift to smooth (using the Smooth brush’s current settings)
- F to adjust brush size
- shift-F for strength
- ctrl-F for rotation (for custom pattern brushes)
- these shortcuts work for most other brushes as well
- Draw Sharp (no default shortcut)
- Clay (C) builds up the surface in a different way… just try it, lol
- Clay Strips (no default shortcut) are square instead of rounded. Be careful - it tends to butcher the other side of thin objects (like my angel’s wings)
- Inflate (I) expands/shrinks the mesh without destroying details too much
- Crease (shift-C) also makes sharp edges when inverted (very useful for fingernails)
- Smooth (shift-S) does what it says, but I normally use the shift shortcut unless I need to change its strength or do a ton of smoothing.
- Pinch (P) pulls stuff together… occasionally useful
- Grab (G) is useful for tweaking proportions and roughing out shapes
- Snake Hook (K) creates tentacles which you can then mold into arms, legs, branches, etc. Dyntopo required!
- Cloth quickly creates a rippled appearance without resorting to tedious cloth physics simulations
- Mask (M) marks areas of your mesh as ‘read-only’, which has many uses. Also notice the Mask menu up top…
- unless you have a specific need, you can ignore all the rest!
Custom Pattern Brushes (“Alpha Textures”)
- open GIMP and create a 512x512 GRAYSCALE image with a black background
- change color to a medium-dark gray
- use the smooth paintbrush tool
- draw a simple pattern
- export as a PNG file in 8bpc GRAY or 16bpc GRAY pixel format
- go back to Blender
- make sure you’re using the Draw brush (press X)
- find Brush Settings in the Properties sidebar (top tab)
- under Texture click New
- go to Texture Properties
- Open… select your PNG file
- the default “Tiled” setting is what I’ve found most useful so far
- I’m not sure how best to organize these. You can duplicate brushes, name them, and add custom thumbnails if you want.
- now just start drawing…
VDM Brushes are a fancier new type of custom brush. They’re similar to normal maps, and you can use them to add features like screw/bolt heads, decorations, and even ears, in a cookie-cutter fashion. I haven’t tried them yet…
Retopology
Setup
- Modeling workspace, Object mode
- Add > Mesh > Plane
- move it near your high-poly sculpted mesh
- name it something like “statue-lowpoly” or “statue-lp”
- Edit mode
- click the Poly Build icon in toolbar

- enable Snapping
- snap to: Face Project
- enable Backface Culling
- enable Project Individual Elements (disable as necessary)
- enable Auto Merge (disable or adjust threshold as needed)
Use PolyBuild to trace your high-poly mesh
- click+drag an edge (when highlighted in blue) to draw a quad
- ctrl+click to draw a triangle
- hold ctrl and click two points to draw a quad
- ctrl+click and drag an inside corner vertex to draw a quad with two existing edges
- drag one vertex onto another to join them (with Auto Merge enabled)
- press X/Y/Z while dragging to draw along an axis (twice for local axis)
- shift-click to delete face/edge/vertex (when highlighted in red)
- regular edit mode commands also work here…
To see what you’re doing, enable Viewport Shading > Retopology (a massive improvement in Blender 3.5; you shouldn’t even bother with older versions for retopo)
- Hide (H) parts of your mesh that are getting in the way (alt-H to unhide them)
Here’s a good 2-minute video by Blender Man: https://www.youtube.com/watch?v=qOMicByvSlc
Texture Baking
Unwrap UVs
- UV Editing workspace
- Unwrap your low-poly object(s)
- I assume you know already how
- note that you can selected multiple objects, go to Edit mode, and unwrap them all to have them share one texture image (well, a set of PBR images)
- I used two separate objects for my angel statue’s body and wings. I used a mirror modifier for the wings and only baked one.
- Tweak and repeat until you have a good UV map
- usually you need some seams, and there’s a bit of an art to it
- if in doubt, Smart Project usually works
Create texture images (this probably isn’t the best way…)
- Shading workspace (or add a shader nodes panel to UV Editing)
- add an Image Texture
- add another Image Texture (or you can duplicate, but you need to unlink them and I find that too confusing)
- DO NOT connect them to anything
- click New on your first image texture, which will be Ambient Occlusion
- Name: filename without the “.png” extension (for example t_statue_1_o)
- set Width/height (1024 is fine for a test/practice bake)
- uncheck Alpha
- OK
- click the Image node to show it in your Image Editor panel
- mouse over to the Image Editor panel
- F3 / Save As…
- PNG, BW (grayscale for a single Occlusion channel), 8 bit depth, 100% compression, Non-Color colorspace
- click New on the other image texture, which will be your Normal Map
- name it appropriately (for example t_statue_1_n)
- same as above except when saving, use RGB color format (three channels for XYZ)
- create any other texture images you need (diffuse/albedo, roughness, metal, etc)
- I haven’t tried baking ORM (occlusion-roughness-metal) textures yet
- if in doubt, create a BW/grayscale image for each, then use another program to combine them into the RGB channels of a color image
- there are Blender addons to automate all this but it’s good to learn it manually first
Baking
- Render Properties (camera icon in sidebar)
- Render Engine: Cycles (Eevee doesn’t support baking yet; its speed sure would be nice…)
- Device: GPU Compute
- Bake settings (near the bottom of Render Properties)
- Bake Type: Normal
- Check “Selected to Active”
- Uncheck Output > Clear Image if you’re baking multiple objects onto a shared set of images (if you’re not, it doesn’t really matter)
- Change other settings if you know what you need
- In the Outliner panel (top right normall) make sure your hipoly and lowpoly objects are both visible, with render ON. Turn OFF anything that might interfere.
- Select your hipoly source object(s)
- Make sure they all have materials.
- Each material MUST have a Normal Map node connected to the Normal input of the Principled BSDF node to apply smooth shading.
- Ctrl-click to select your lopoly target object (the last-selected object is Active, hence “Selected to Active” above. THIS IS IMPORTANT.)
- Baking the first texture…
- make sure Bake Type is set to Normal
- in your Shader Nodes panel, click your Normal Map image texture node. THIS IS IMPORTANT. If you don’t click the correct one, it’ll overwrite the wrong one.
- now click that BAKE button!!
- you should see the result in your Image Editor panel; with experience you’ll know if it looks right or wrong
- To preview the result in 3D, hide your hipoly object, make sure your 3D viewport is in Rendered shading mode, and connect your image node’s Color output through a Normal Map node to the Normal BSDF input.
- If it looks right, SAVE the image
- Next texture…
- Bake Type: Ambient Occlusion
- click your Occlusion Map image texture node
- BAKE!
- repeat for any other textures you have (diffuse/albedo, roughness, metal, etc)
- if you have multiple objects, bake each texture for each object
- remember to SAVE your texture images after each baking step (if you mess one up, just reload it)
- To preview result, connect AO color to input B of a Mix Color node, connect diffuse color to A, change change Mix to Multiply, connect output to Base Color, and tweak the mix factor if needed.
- If needed…
- Image format: RGB or RGBA (for alpha transparency), sRGB colorspace
- Bake Type: Diffuse
- click your Diffuse Map image texture node
- BAKE!
Common problems
- Cycles render engine not selected
- Wrong texture image target selected
- Apparently baking fails if the Margin setting is too big for your UV map
- default 16 pixels seems like overkill, but zero will show seams (if you have any)
- 2 seems to be enough for 1k textures
- 8 should work for 4k
- this seems like one of the finer points of unwrapping and baking…
- MARGIN MUST BE ZERO for ALPHA TEXTURES. If you need seams in an alpha texture, you must either hide them where no one will notice (if possible) or add margins somehow…
- A) Two-pass diffuse baking. Arrange hipoly meshes as separate solid and partly-transparent objects, with any ugly seams in solid objects. Bake the transparent objects first with MARGINS OFF. Then do a second diffuse baking pass for the solid objects WITH MARGINS and Clear Image OFF.
- B) or manually edit texture images (fill in the margins along seams only) (diffuse+alpha only)
- C) or manually edit UVs (pull in seam edges 2px OR MORE) (easiest if they’re fairly straight; Blender’s builtin Magic UV addon can help with that)
- Many glitches can be solved with the settings under “Selected to Active”
- try extrusion first (I used 0.1m for my statue which is 1.5m in height)
- extrusion=0.03 and max ray distance=0.06 are about right for clothing
- worst case, use a cage object (basically, copy your low-poly object, alt-S scale it out a bit, and clean up any vertex issues caused by that)
- Make sure your meshes are clean (no duplicate vertices, little holes, jumbled edges, etc)
- Texture resolution too low? Increase it
- Baking too slow? Decrease it
- Faceted normal map?
- source mesh should generally be set to Shade Smooth
- target mesh should basically ALWAYS be smooth shaded
- source mesh needs Normal Map shader node going into the Normal input (that’s all, nothing else) (for some reason this is only needed for baking, not regular rendering)
- when previewing your baked normal map in Blender, make sure your it’s connected through a Normal Map node (which applies the smooth shading)
- Not sure how to hook up shader nodes in Blender? https://www.cgbookcase.com/learn/how-to-use-pbr-textures-in-blender/
Godot Import
- Export from Blender
- select your lopoly object(s) (OR make sure they’re the only objects with rendering on - the camera icons in the Outliner panel)
- File > Export > glTF (2.0)
- Format: binary (.glb) is fine for this
- Include: Selected Objects (OR Renderable Objects)
- Data > Mesh… you want UVs, Normals, and possibly Apply Modifiers
- Data > Material… Materials: Placeholder
ASSUMPTION: your blender files and texture images should be under your Godot project folder. This way Godot can access them directly and Blender doesn’t have to export copies of them (that’s why we enable placeholder materials)
- In Godot, find the .gltf file, right-click it, and choose New Inherited Scene
- In the inspector, go to Geometry > Material Override and make a New StandardMaterial3D
- click the circle to expand it, and expand the Normal Map and Ambient Occlusion sections (and any other textures you baked)
- enable those and drag your texture images in from the filesystem panel
Notes
Don’t expect to master all this right away if you don’t have much experience. Sculpting is pretty intuitive but the rest is very exacting technical art. I had a lot of practice from working as a draftsman for several years. So if you find this all overwhelming, and videos don’t help, try something easier for now and give it another try in a year or so.
Leave a comment
Log in with itch.io to leave a comment.